Article Number: 000139735
How to enable trusted platform module using a ConfigMgr 2007 task sequence
Summary: Follow these steps for creating a task sequence to Enable TPM on a Dell Business Client System (Latitude, Optiplex, or Precision Workstation).
Article Content
Symptoms
Follow these steps for creating a task sequence to Enable TPM on a Dell Business Client System (Latitude, Optiplex, or Precision Workstation).
This example will use the Dell Client Configuration Toolkit in a ConfigMgr task sequence. If you need to enable TPM on systems that have the Dell OpenManage Client Instrumentation installed, You can call the Sample VBScripts directly from your task sequence, if you prefer.
The following steps describe how to prepare a ConfigMgr 2007 Task Sequence to Activate TPM as well as enable Windows® BitLocker® Drive Encryption. This is a sample task sequence that can be used with traditional software distribution, as well as it could be integrated into your Operating System Deployment Task Sequence. From the whitepaper "Enabling TPM on Dell Business Client Systems", a BIOS password is required in order to enable and activate TPM. This Task sequence automates the required steps.
- Download and Install the latest version of the Dell Client Configuration Toolkit (CCTK)
- Go to Dell Drivers and Downloads
- Select a business client model (Latitude, OptiPlex, etc) or supply your Service Tag
- Under "Systems Management", select the "Dell Client Configuration Toolkit"
- Extract and Install on a supported operating system.
- Create ConfigMgr Packages for X86 and X64 CCTK, and Import the "Dell Enable TPM" Task Sequence
- Create ConfigMgr Packages for X86 and X64 CCTK, and Import the "Dell Enable TPM" Task Sequence
- Copy %ProgramFiles%\Dell\CCTK\* to a location that will be used for Configuration Manager. You will have two subfolders, x86, and x86_64
- Create two ConfigMgr Packages, using the source directory for x86, and x86_64. Send to Distribution Points
- Import the DellEnableTPM.xml Task sequence.
- Configure the Task Sequence
- Notice the Task Sequence has been divided into two groups – one for x86 and one for x64 platforms. The group uses WMI Filters to ensure that the Task Sequence steps only run on Dell clients with the appropriate Operating System Architecture. You can view/modify these as necessary
- For each of the steps in the Task Sequence, specify the appropriate package. (all x86 steps require the x86 CCTK package, and the x64 steps require the x64 CCTK package)
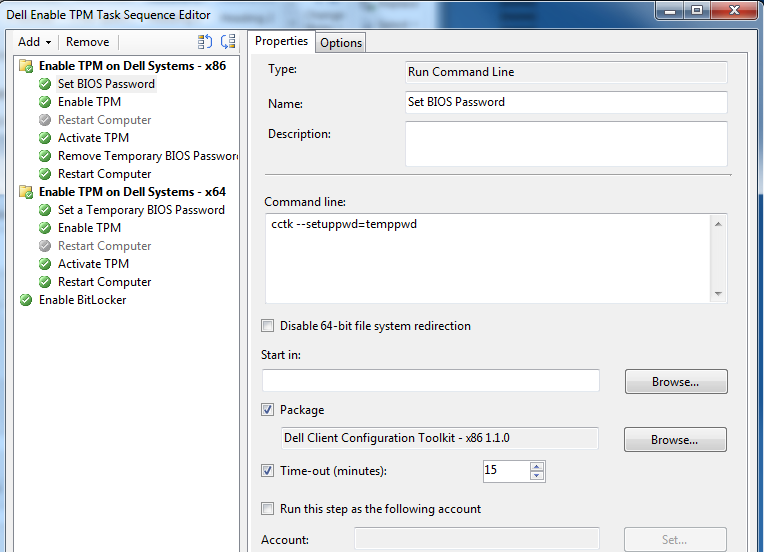
Figure 1: BIOS Command
- Notice in the previous image, we set a BIOS password. Modify this to your needs. If you already have a BIOS password, you can disable this step. Be sure to view/modify the other steps in this Task Sequence as needed.
- Also notice that a "Restart Computer" step was disabled for both x86 and x64. Depending on the model of your Dell, an additional reboot may be required between enabling TPM and Activating TPM.
- The final step is to Enable Bitlocker – review the Microsoft TechNet documentation at https://technet.microsoft.com/en-us/library/bb632526.aspx for Bitlocker requirements. From the document, you will see that Bitlocker requires two partitions. You can use the Bitlocker Drive Preparation Tool (BdeHdCfg.exe) to reconfigure drives prior to enabling Bitlocker. See https://technet.microsoft.com/en-us/library/ee732026(WS.10).aspx for more information.

Article Properties
Affected Product
Latitude, Fixed Workstations
Last Published Date
21 Feb 2021
Version
3
Article Type
Solution