Article Number: 000136459
How to Configure DHCP on Windows Server 2012
Summary: Step by step visual guide to configure DHCP on Windows Server 2012
Article Content
Symptoms
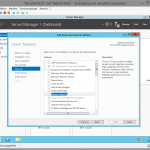
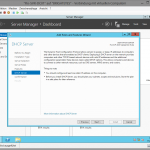
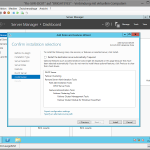
1. You should install the role and RSAT Management features like discribed in Point 1 to Point 6 in this article. Please select this time DHCP Server.
 |
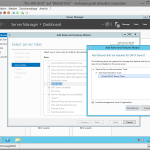 |
| Figure 1: DHCP Server | Figure 2: DHCP Server |
 |
 |
| Figure 3: DHCP Server | Figure 4: DHCP Server |
2. After you installed the DHCP Server, you should see the role in the Server Manager. You should also see the warning that you have to complette the DHCP Server configuration. Please click on "More" to open the detail information.

Figure 5: DHCP
3. In the detail window please click on "Configure DHCP configuration" to start the Wizzard.

Figure 6: Configure DHCP configuration
4. The Install Wizzard starts.

Figure 7: Install Wizzard starts
5. In the next step you can authorize the DHCP server to your active directory. You should do this because DHCP will update DNS and AD DS entry's directly after allocating IP to DHCP Client. The credetial you choose should have Domain admin rights.

Figure 8: Domain admin rights
6. After this the DHCP will authorized to AD DS. In my lap this took 5 minutes.

Figure 9: DHCP will authorized
7. Please be adviced in Windows Server 2012 "closed" don't mean the configuration has finished. It only means that configuration will be done in Background. You can see the status by clicking on the Flag in the top of the Server Manager.

Figure 10: Closed
8. To configure a DHCP Scope we have to open the DHCP MMC. So please click "Tool" and than "DHCP".

Figure 11: DHCP Scope
9. In the the DHCP MMC we click right on the DHCP Server and than on first on "Add/Remove Bindings...".

Figure 12: Add/Remove Bindings
10. Please check if your Binding is set on the right Network Interface if not please change it before you go on.

Figure 13: Network Interface
11. After you checked and changed the settings please click ok and go back in the DHCP MMC. Klick right on the DHCP IPv4 stack and select "New Scope".

Figure 14: New Scope
12. The wizzard starts. Klick "Next".

Figure 15: Wizzard starts
13. Select your Scope Name and a Discription.

Figure 16: Scope Name
14. Now you have to select the IP range and the subnet, that will be managed by your server. To calculate the range you need you can use this online tool LINK.

Figure 17: IP Address
15. Now you can select exclusion from DHCP e.g. static IPs or reservations and the delay.

Figure 18: IP Address

Figure 19: Address Range
16. Now you have to set the leasetime. Lease means the time that a DHCP client keeps his IP before he ask the DHCP server again for a renewal. When you have a big IP scope and enough IP's and no special security audits in your company, you could keep 8 days. When you use DHCP for WiFi connections or only a few IP's left, you should set the lease to maximum 2 days.

Figure 20: DHCP
17. Here you can select if you want to configure the DNS, default gateway and WINS via wizzard or later manualy. In this guide I will configure the options with wizzard. Later I will show you how to configure it manualy.

Figure 21: WINS via wizzard
18. At first we configure the default gateway. Normaly this is a router or routable switch (Layer 3 Switch).

Figure 22: Router

Figure 23: Router Switch
19. After this we configure the DNS Options that will provided via DHCP. First the Domain name. This should be the name of your DNS Zone that will be handled with this IPs and the DNS Servers. You can have as much DNS Servers as you need but mostly I see that Admins have 2 or 3 redundant DNS Servers.

Figure 24: DNS Server
Every entry you make will be checked. If an DNS Server is not reachable you will get a warning but you are able to enter the IP either.

Figure 25: DNS Server

Figure 26: DNS Server
20. Auf configuring DNS you can configure WINS. In my case I will leave this point out because I have no application or operating system planned that need WINS. You can configure it manualy later at any time, so no worries.

Figure 27: Configure WINS
21. We have nearly finished, now you can decide if you want to start the scope now ok later. Please select now.

Figure 28: Start the scope
22. Now click "Finish" and the scrope will be installed and activated.

Figure 29: Scrope will be installed and activated
23. The DHCP MMC should look now nearly like this.

Figure 30: DHCP MMC look
24. To check, please power on one of your Clients in this network and check with: IPconfig /all if you get an IP and the settings you have entered in the DHCP Server.
Article Properties
Affected Product
Servers, Microsoft Windows 2012 Server, Microsoft Windows 2012 Server R2
Last Published Date
21 Feb 2021
Version
3
Article Type
Solution