Article Number: 000175535
How to install Oracle VM 3.2.2
Summary: Our charter is to deliver solutions that simplify IT by providing database solutions, custom development, dynamic datacenters, flexible computing.
Article Content
Symptoms
Dell PowerEdge Systems Oracle 11g R2 Database on Enterprise Linux x86_64 using Oracle VM 3.2.2 Getting Started Guide
 NOTE: A NOTE indicates important information that helps you make better use of your computer.
 CAUTION: A CAUTION indicates potential damage to hardware or loss of data if instructions are not followed.
Overview
This document applies to Oracle Database 11g R2 running on Oracle VM 3.2.2.Installation Pre-requisites
Hardware Requirements
- Three physical servers, Two for Oracle VM Server and One Oracle VM manager.
- Each physical server requires a minimum of 2 gigabytes (GB) of physical memory.
- Oracle VM guest memory requirements vary for each guest operating system.
- A monitor that supports resolution of 1024 x 768 to correctly display the Oracle Universal Installer (OUI)
Network Requirements
- Minimum of one network interface card is required.
 NOTE: It is recommended that you ensure each node contains at least three network interface cards (NICs) for Oracle installations using Oracle VM.
 NOTE: In case of iSCSI storage, it is recommended to use recommended four NICs.
Installing Oracle VM Server
- Download the Oracle VM software from http://edelivery.oracle.com/oraclevm
- Boot using the Oracle VM CD and Install Oracle VM Server software.
Installing Oracle VM Manager
- Oracle VM Manager uses an Oracle database as a repository. Install Oracle SE (Standard Edition) or Oracle EE (Enterprise Edition) on the intended Oracle VM Manager server.
 NOTE: Oracle XE (express edition) is not a supported product for Oracle VM Manager
- Oracle Database Release 10.2.0.4 or greater
- Oracle Database Release 11.1.0.7 or greater
- Oracle Database Release 11.2.0.1 or greater
http://docs.oracle.com/cd/E27300_01/E27308/html/vmiug-manager-requirements.html
Install Oracle VM Manger. For more details refer Install Oracle VM Manager Software.
Configuring the Oracle VM Environment
Configuring an Oracle VM environment includes the following:
- Discovering servers
- Creating and configuring multiple networks
- Discovering and configuring storage
- Creating a storage repository
- Creating a server pool
- Creating virtual machines.
http://hostname: port/ovm/console
For example: http://vmmanager.bdcdb.com:7001/ovm/console
Discovering Oracle VM Servers
- In the Oracle VM Manger console click the Servers and VMs tab.
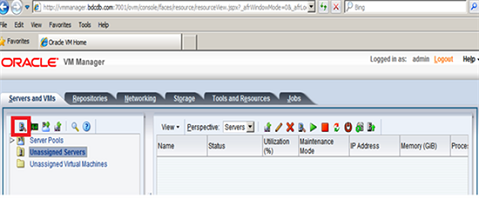
Figure 1: Oracle VM Manger
- Click Create Server pool from the tool bar and enter the Server pool name and virtual IP address. Select the Clustered Server Pool to enable clustering of the Oracle VM Servers within the server pool in order to enable HA.
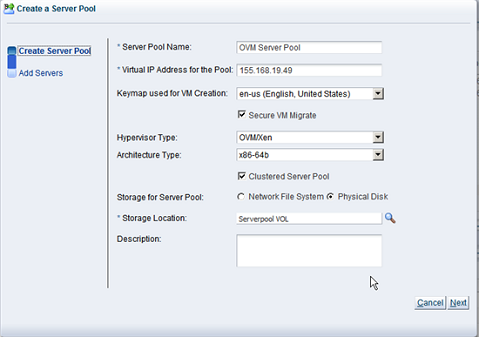
Figure 2: Create Server pool
- Select Physical disk in the storage for server pool and click Storage Location and select the Physical disk for the server pool and click OK
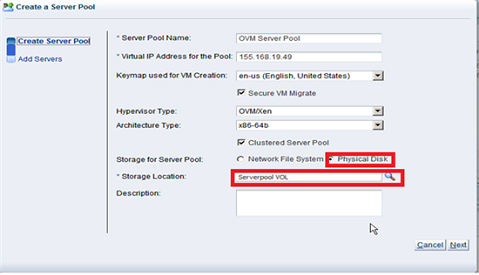
Figure 3: Select Physical disk in the storage
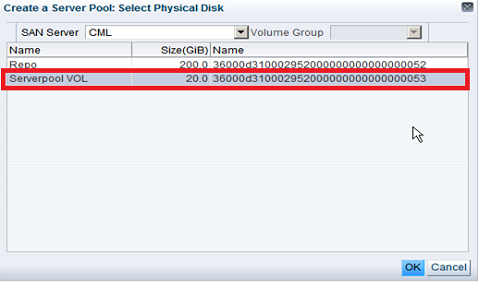
Figure 4: Select the Physical disk for the server pool
- Click next to add servers to the server pool.
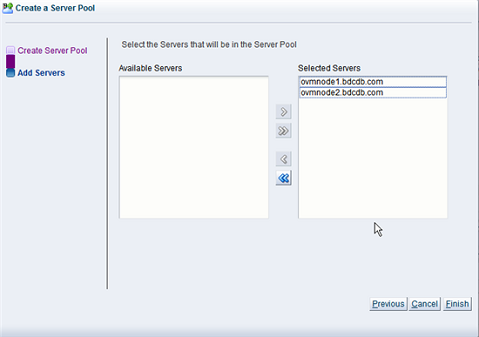
Figure 5: Add servers to the server pool
- Add the available servers and click Finish.
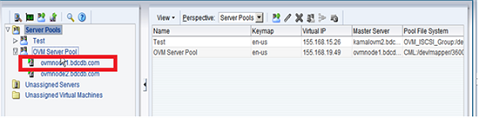
Figure 6: Add the available servers
Creating a Storage Repository and Adding Resources
 NOTE: A storage repository should be at least 10GB in size. In addition to this minimum size requirement, you should include enough storage space for virtual machines, templates, ISO files and other virtual machine resources.
- In the Oracle VM manager, click Repositories tab
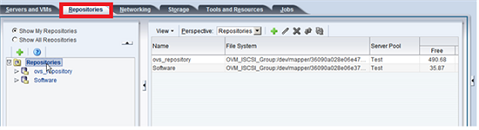
Figure 7: Oracle VM manager
- Click Create New Repository (plus sign icon) from the tool bar and enter the repository name and repository location. If you select physical disk as a repository location, select the appropriate server pool that the repository should reside.
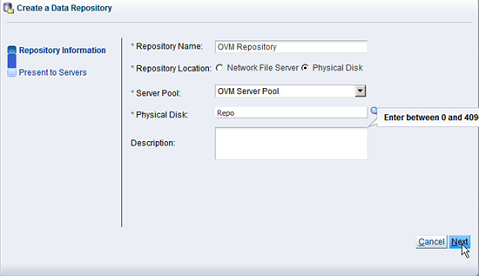
Figure 8: Create New Repository
- Click on select physical disk to search for the location. In the select physical disk window, select physical disk for repository and click Next.
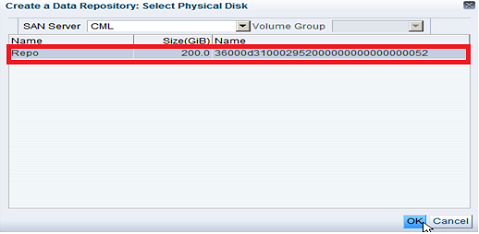
Figure 9: Click on select physical disk to search for the location
- Click next to present the Oracle VM servers to the repository.

Figure 10: Oracle VM servers to the repository
- Click Finish and new storage repository is displayed in the Repositories tab.
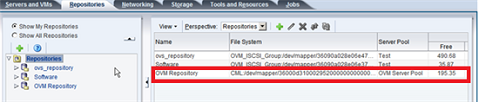
Figure 11: Repositories tab
Importing ISO resource
Pre-requisite
 NOTE: The directory should be made available via a NFS, HTTP or FTP share.
Refer to "Virtual Machine Installation Media" for performing the NFS/ HTTP/FTP share
To import an ISO file:
- Click the Repositories tab. Select the repository where the ISO files are stored. Select ISOs in the navigation tree. Select Import ISO... button in the toolbar in the management pane.
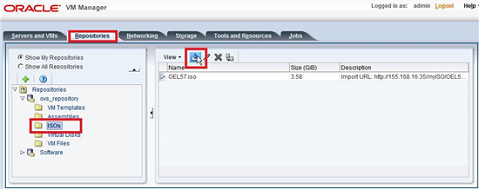
Figure 12: Select ISOs in the navigation tree
- The Import ISO dialog box is displayed.
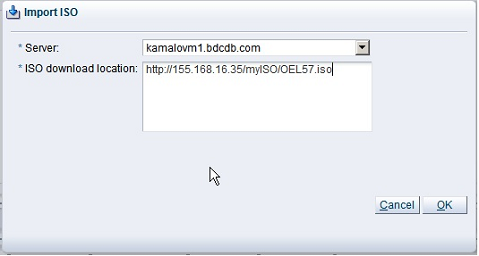
Figure 13: Import ISO
The ISO file is then uploaded to the repository as shown below.

Figure 14: Provide the ISO location
Creating VNICs
VNICs) can be used by the virtual machines as network cards. A VNIC can be created by defining a range of MAC addresses to use for each VM. Each MAC address corresponds with a single VNIC, which is used by a virtual machine.
To create VNICs
- In the Oracle VM Manager, click the Networking tab. Select the Virtual NICs sub tab
- In the Create VNICs tab, click AutoFill to get the next MAC address and select the number of VNICs to be created.
- Click create to generate the VNICs.
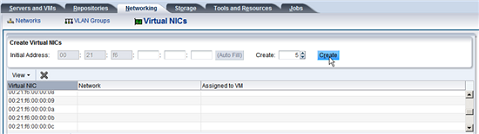
Figure 15: Creating VNICs
Creating Virtual Machines
Virtual machines can be created using the following methods.- ISO files
- VM Templates
- Assemblies
Installing single node standalone database on the Oracle VM
- Launch the VM console from the OVM Manager
Article Properties
Last Published Date
10 Apr 2021
Version
3
Article Type
Solution