Article Number: 000148759
How to Install a Standalone Oracle Database
Summary: Standalone Oracle Database
Article Content
Symptoms
How do I Install a Standalone Oracle Database?
Applies to:
RHEL 6.x, OL6.x
Contents
- Overview
- Software and Hardware Requirements
- Operating System Requirements
- Network Requirements
- Hardware Requirements
- Preparing for Oracle Installation
- Attaching to RHN/ULN Repository
- Installing the Dell Validated RPM
- Installing the Dell Oracle Utilities RPM
- Oracle Software Binary Location
- Setting up the Network
- Public Network
- Preparing Shared Storage for Oracle Installation
- Partitioning the Shared Disk
- Adjusting the StripeElement Size on a Primary Partition
- Setting up Permissions for ASM disks using udev rules
- Installing Oracle 11g R2 Grid Infrastructure for standalone server
- Installing Oracle 11g R2 Database (RDBMS) Software
Overview
This document applies to Oracle Database 11g R2 running on Red Hat Enterprise Linux 6.x AS x86_64 or Oracle Enterprise Linux 6.x AS x86_64.Software and Hardware Requirements
Hardware Requirements
- Oracle requires 1.5 gigabytes (GB) of physical memory.
- Swap space must be equal to the amount of RAM allocated to the system.
- Oracle's temporary space (/tmp) must be at least 1 GB in size.
- A monitor that supports resolution of 1024 x 768 to correctly display the Oracle Universal Installer (OUI)
- For Dell supported hardware configurations, see the Software Deliverable List (SDL) for each Dell Validated Component at dell.com/oracle.
| Table 1-1 | Minimum Disk Space Requirements |
|---|---|
| Software Installation Location | Size Required |
| Grid Infrastructure home Oracle Database home |
4.5 GB Space 4 GB of Space |
| Shared storage disk space | Sizes of database and Flashback Recovery Area |
Network Requirements
- It is recommended that you ensure at least one network interface cards for public network.
- The hostname must follow the RFC 952 standard (www.ietf.org/rfc/rfc952.txt). Hostnames that include an underscore ("_") are not permitted
- Red Hat Enterprise Linux 6.x AS x86_64
- Oracle Linux 6.x AS x86_64
Preparing for Oracle Intallation
Attaching to RHN/ULN Repository
 NOTE: The documentation provided below discusses how to setup a local yum repository using your operating system installation media. If you would like to connect to the RHN/ULN channels, see the appropriate documentation. For Red Hat see, redhat.com/red_hat_network. For information relating to ULN network see, linux.oracle.com.
- One of the requirements is to have the DVD image mounted either by physical media or by ISO image.
- To mount the DVD, insert the DVD into the server and it should auto-mount into the /media directory.
- To mount an ISO image we will need to run the following command as root, substituting the path name of your ISO image for the field myISO.iso:
mkdir /media/myISO
mount -o loop myISO.iso /media/myISO
- To install and configure the http daemon, configure the machine that will host the repository for all other machines to use the DVD image locally. Create the file /etc/yum.repos.d/local.repo and enter the following:
[local]
name=Local Repository
baseurl=file:///media/myISO/Server
gpgcheck=0
enabled=0
name=Local Repository
baseurl=file:///media/myISO/Server
gpgcheck=0
enabled=0
Installing the Dell Validated RPM
Once the Database node is attached to the appropriate yum repository, we will need to install the Dell Validated RPM package. The Dell Validated RPM package automates certain pieces of the installation process required for the installation of Oracle.The process to install the Dell Validated RPM package is as follows:
- Download the latest Dell Oracle Deployment tar file from
http://downloads.dell.com/solutions/enterprise-solution-resources/deployment_guide_rhel6.pdf
 NOTE: The filename will follow the convention: Dell-Oracle-Deployment-OS-version-year-month.tar, for example: Dell-Oracle-Deployment-Lin-EL6-2012-08.tar
- Copy the Dell Oracle Deployment tar file to a working directory of all your cluster nodes.
- To go to your working directory, enter the following command:
# cd </working/directory/path>
- Untar the Dell-Oracle-Deployment release using the command:
- # tar zxvf Dell-Oracle-Deployment-o-v-y-m.tar.gz
 NOTE: Where, o is the operating system, v is the operating system version, y is the year, and m is the month of the tar release.
- Change directory to Dell-Oracle-Deployment-o-v-y-m
- Install the Dell-Oracle-RDBMS-Server-11gR2-Preinstall RPM package on all your cluster nodes using the following command:
# yum localinstall dell-oracle-rdbms-server-11gR2-preinstall* --nogpgcheck
Installing the Dell Oracle Utilities RPM
The Dell Oracle utilities RPM is designed to do the following Dell and Oracle recommended settings:- Create Grid Infrastructure directories, set ownership, and permissions.
- Create grid user.
- Create Oracle Database (RDBMS) directories, set ownership, and permissions.
- Create the Oracle base directories, set ownership, and permissions.
- Set pam limits within (/etc/pam.d/login).
- Setup /etc/profile.
- Set SELinux to Disabled.
- Install the Dell PowerEdge system component drivers if applicable.
- Set kernel parameters.
- Set nproc for grid user within (/etc/security/limits.conf)
- Install the Dell oracle utilities RPM package from the Dell-Oracle-Deployment=0-y-m directory the by typing:
# yum localinstall dell-oracle-utilities* --nogpgcheck - Once the rpm is installed, run the dodeploy script to setup the environment as follows: # dodeploy -g -r 11gR2
For more information about the Dell oracle utilities RPM and its options, check the man pages using the command: # man 8 dodeploy
 NOTE: The Dell-Oracle-Deplyoment tar contains the latest supported drivers provided from our Software Deliverable List (SDL). Consult the README file found within the Dell-Oracle-Deployment tar for installation instructions of the latest drivers.
Oracle Software Binary Location
The Oracle software binaries should be located on the database node. It is important to note that starting with Oracle 11g R2 (11.2.0.3), Oracle Database patch sets are full installation of the Oracle software. For more information on how this impacts future Oracle deployments, see My Oracle Support note: 1189783.1 Important Changes to Oracle Database Patch Sets Starting with 11.2.0.2.
Setting up the Network - Public Network
 NOTE: Ensure that the public IP address is a valid and routable IP address.
To configure the public network :
- Log in as root.
- Edit the network device file /etc/sysconfig/network-scripts/ifcfg-eth#
where # is the number of the network device: NOTE: Ensure that the Gateway address is configured for the public network interface. If the Gateway address is not configured, the Oracle Grid installation may fail.
DEVICE=eth0
ONBOOT=yes
IPADDR=<Public IP Address>
NETMASK=<Subnet mask>
BOOTPROTO=static
HWADDR=<MAC Address>
SLAVE=no
GATEWAY=<Gateway Address> - Edit the /etc/sysconfig/network file, and, if necessary, replace localhost.localdomain with the qualified public node name. For example, the command for node :hostname=node.domain.com
- Type service network restart to restart the network service.
- Type ifconfig to verify that the IP addresses are set correctly.
- To check your network configuration, ping the public IP address from a client on the LAN.
Preparing Shared Storage for Oracle Installation
 NOTE: In this section, the terms disk(s), volume(s), virtual disk(s), LUN(s) mean the same and are used interchangeably, unless specified otherwise. Similarly, the terms Stripe Element Size and Segment Size both can be used interchangeably.
Oracle Standalone using Oracle ASM requires LUNs for storing Oracle Database files, and Flash Recovery Area (FRA). To ensure high availability it is recommended that you have:
- At least two shared disks to store your database. Each shared disk should be the same disk speed and size.
- At least two shared volumes/LUNs or volumes to store your FRA. Ideally, the FRA space should be large enough to copy all of your Oracle datafiles and incremental backups. For more information on optimally sizing your FRA, see My Oracle Support ID 305648.1 section "What should be the size of Flash Recovery Area?"
 NOTE: The use of device mapper multipath is recommended for optimal performance and persistent name binding.
 NOTE: For more information on attaching shared LUNs/volumes, see the Wiki documentation found at: http://en.community.dell.com/dell-groups/enterprise_solutions/w/oracle_solutions/3-storage.aspx
Partitioning the Shared Disk
To use the fdisk utility to create a partition:
- At the command prompt, type one of the following:
- #> fdisk –cu /dev/<block_device>
- #> fdisk –cu /dev/mapper/<multipath_disk>
Where, <block_device> is the name of the block device that you are
creating a partition on. For example, if the block device is /dev/sdb, type: fdisk –cu /dev/sdb
Device contains neither a valid DOS partition table, nor Sun, SGI or OSF disklabel
Building a new DOS disklabel with disk identifier 0x89058e03.
Changes will remain in memory only, until you decide to write them.
After that, of course, the previous content won't be recoverable.
Warning: invalid flag 0x0000 of partition table 4 will be corrected by w(rite)
The device presents a logical sector size that is smaller than
the physical sector size. Aligning to a physical sector (or optimal
I/O) size boundary is recommended, or performance may be impacted.
- Command (m for help): n # To create a new partition
- Command actione extendedp primary partition (1-4):
- P # To create a primary partition
- Partition number (1-4): 1
- First sector (4096-xxxxxx, default 4096):
- Repeat step 1 for all the disks.
- Type the following to re-read the partition table and to be able to see the newly created partition(s)
#> partprobe
Or
#> service multipathd restart
Or
#> kpartx –a /dev/mapper/<multipath_disk>
Or
#> service multipathd restart
Or
#> kpartx –a /dev/mapper/<multipath_disk>
- Reboot the system if your newly created partition is not displayed properly.
Setting up Permissions for ASM disks using udev rules
Red Hat Enterprise Linux 6/Oracle Linux 6 have the ability to use udev rules to ensure that the system properly manages permissions of device nodes. In this case, we are referring to properly setting permissions for our LUNs/volumes discovered by the OS. It is important to note that udev rules are executed in enumerated order. When creating udev rules for setting permissions, please include the prefix 20- and append .rules to the end of the filename. An example file name is 20-dell_oracle.rulesIn order to set udev rules, one must capture the WWIDs of each disk to be used within your ASM device using the scsi_id command.
The command is as follows:
scsi_id --page=0x83 --whitelisted --device=/dev/sdX
where sdX is the name of your block device.
If one must run this command to capture multiple WWIDs, one could use the following for loop to do just that via the shell:
[root@rhel6 ~]# for i in sdb sdc sdd sde; do \ printf "%s %s\n" "$i" \ "$(scsi_id --page=0x83 --whitelisted --device=/dev/$i)"; done
Output:
sdb 360026b900061855e000008a54ea5356a
sdc 360026b9000618571000008b54ea5360b
sdd 360026b900061855e000008a54ea5356a
sde 360026b9000618571000008b54ea5360b
Once the WWIDs have been captured, create a file within the /etc/udev/rules.d/ directory and name it 20-dell_oracle.rules. A separate KERNEL entry must exist for each storage device and will require adding the WWID to the "RESULT==" field.
An example of what needs to be placed in the /etc/udev/rules.d/20-dell_oracle.rules file
#------------------------ start udev rule contents ------------------#
KERNEL=="dm-*", PROGRAM="scsi_id --page=0x83 --whitelisted --device=/dev/%k",RESULT=="360026b9000618571000008b54ea5360b", OWNER:="grid", GROUP:="asmadmin"
KERNEL=="dm-*", PROGRAM="scsi_id --page=0x83 --whitelisted --device=/dev/%k",RESULT=="360026b900061855e000008a54ea5356a", OWNER:="grid", GROUP:="asmadmin"
#-------------------------- end udev rule contents ------------------#
As you can see from the above, the KERNEL command looks at all dm devices, executes the PROGRAM which captures the WWID, if the RESULT of the WWID is matched, appropriately assign the grid user as the OWNER and the asmadmin group as the GROUP.
Installing Grid Infrastructure for Standalone Server
Before you install the Oracle 11g R2 Grid Infrastructure software for a Standalone Server on your system:
- Ensure that you have already configured your operating system, network, and storage based on the steps from the previous sections within this document.
- Locate your Oracle 11g R2 media kit.
- Log in as root
- If you are not in a graphical environment, start the X Window System by typing: startx
- Open a terminal window and type: xhost +
- Mount the Oracle Grid Infrastructure media.
- Log in as grid user, for example: su - grid.
- Type the following command to start the Oracle Universal Installer:<CD_mountpoint>/runInstaller
- In the Download Software Updates window, enter your My Oracle Support credentials to download the latest patch updates. If you choose not to download the latest patches, select Skip software updates.
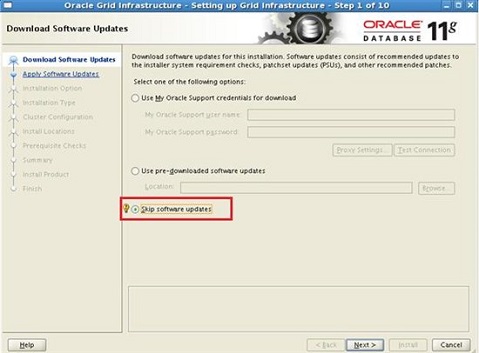
Figure 1 : Skip software upgrade
In the Select Installation Option window, select Install and Configure Grid Infrastructure for a Standalone Server and click Next.
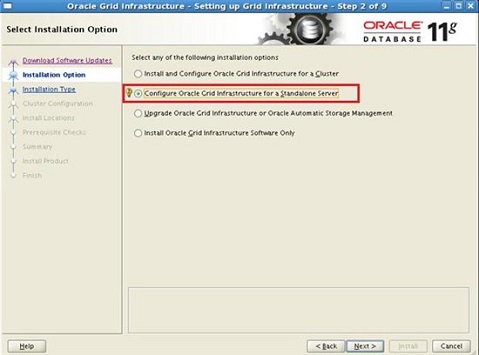
Figure 2 : Configure
In the Create ASM Disk Group window, enter the following information:
- ASM diskgroup— Enter a name, for example: DATA
- Redundancy— For your ASM disks, select High if five ASM disks are available, select Normal if three ASM disks are available, or select External if one ASM disk is available (not recommended).

Figure 3 : ASM Disk Group
Click on Use Same Passwords for these accounts & Click Next

Figure 4 : Password
Leave the Operating System Groups to be default, Ignore the Warning and Click Next

Figure 4 : Oracle Base and Software Location
Choose the Oracle Base and Software Location, and Click Next.
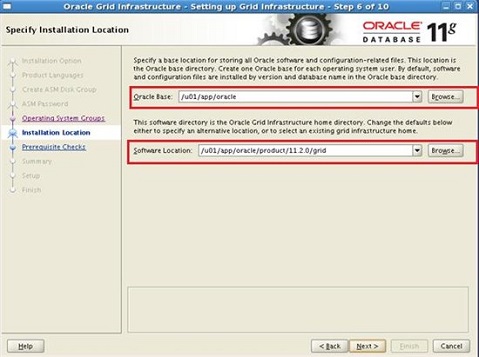
Figure 5 : Prerequisite Checks
The Prerequisite Checks are performed& the summary screen is presented. Click Next on the summary screen.
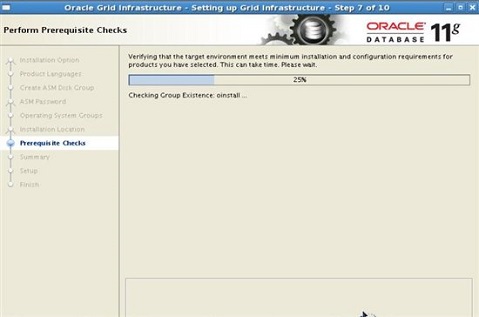
Figure 6 : Installation proceeds
The Installation proceeds. And the Progress is seen in the setup screen.

Figure 7 : Setup
After the installation is complete, the Execute Configuration Scripts wizard is displayed. Complete the instructions in the wizard and click Ok.

Figure 8 : Grid Infrastructure is installed
Now that the Grid Infrastructure is installed, let’s now install the Database.
Installing Oracle 11g R2 Database (RDBMS) Software
- Log in as root and type: xhost +.
- Mount the Oracle Database 11gR2 media.
- Log out as root user and log in as Oracle user by typing:
su - oracle - Run the installer script from your Oracle database media:
<CD_mount>/runInstaller - In the Configure Security Updates window, enter your My Oracle
- Support credentials to receive security updates, else click Next.

Figure 9 : Download patch
- In the Download Software Updates window, enter your My Oracle Support credentials to download patch updates available after the initial release. If you choose not to update at this time, select Skip software updates and click Next.

Figure 10 : Installation Option window
- In the Select Installation Option window, select Install database software only.

Figure 11 : Installation Option window
- In the Grid Installation Options window: Select Single Instance database installation and Click Next.

Figure 12 : Product Lanaguages window
- In the Select Product Lanaguages window, select English as the Language Option and click Next.
- In the Select Database Edition window, select Enterprise Edition and click Next.

Figure 13 : Database Edition window
- In the Installation Location window,
- Specify the location of your Oracle Base configured within the Dell oracle utilities RPM.
 NOTE: The default locations used within the Dell Oracle utilites RPM are as follows:
- Oracle Base—/u01/app/oracle
- Software Location—/u01/app/oracle/product/11.2.0/db_1
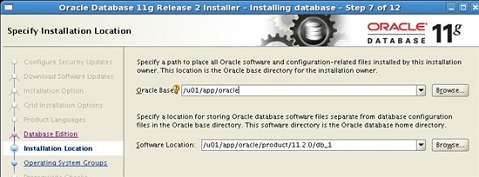
Figure 14 : Installation Location window
- In the Privileged Operating System Groups window, select dba for Database Administrator (OSDBA) Group and oinstall for Database Operator (OSOPER) Group and click Next.

Figure 15 : Privileged Operating System Groups
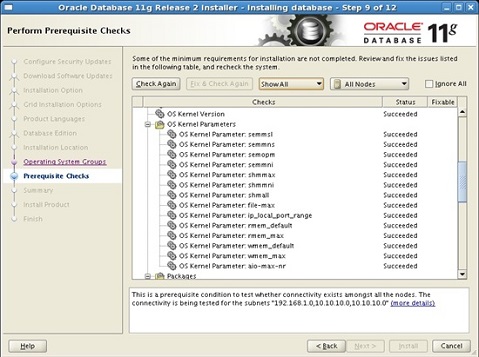
- In the Perform Prerequisite Checks window, check the overall status of all the prerequisites.
- If any prerequisites fail and have the status as Fixable, click the Fix & Check Again button.
- Execute the runfixup.sh script provided by the Oracle OUI.
 NOTE: If there are other prerequisites that display status Error, repeat step 13, If the Error status still persists after all changes have been fixed, select Ignore All.
- In the Summary window, select Install.
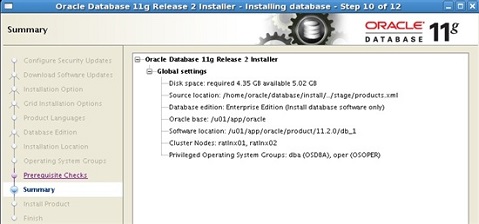
Figure 15 : Completion of the installation process
- On completion of the installation process, the Execute Configuration scripts wizard is displayed. Follow the instructions in the wizard and click Ok.
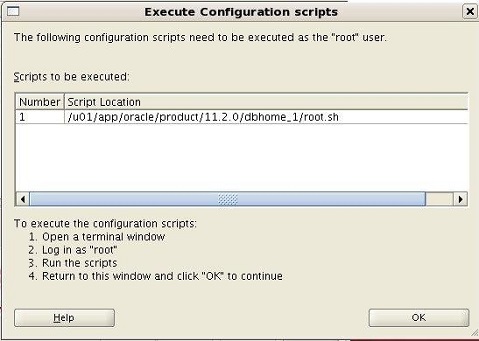
Figure 17 : Finish window
- In the Finish window, click Close.
- Login as oracle user.
- From $<ORACLE_HOME>, run the DBCA utility by typing:
$<ORACLE_HOME>/bin/dbca & - In the Welcome window, select Oracle Single Instance Database and click Next.
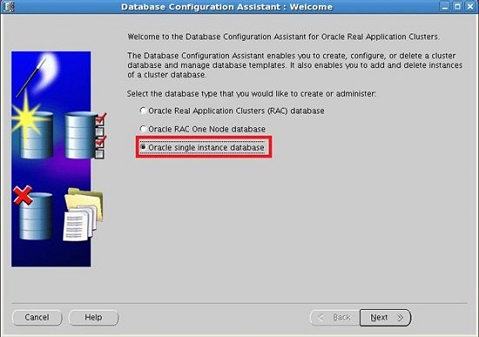
Figure 18 : Create Database
In the operations window, select Create Database, and Click Next

Figure 19: Custom Database
Select Custom Database Option the Database Templates Screen
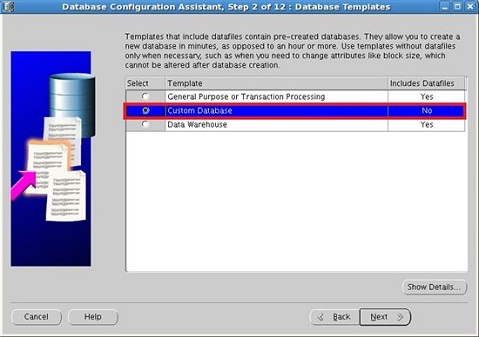
Figure 20: Global Database Name
In the Database Identification window:
- Provide the Global Database Name
- Provide the SID

Figure 21: Management Options window
In the Management Options window, select the default values and click Next.
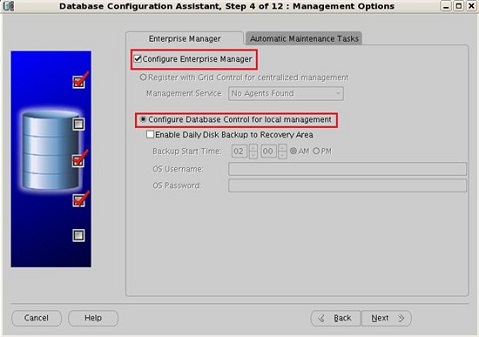
Figure 22 : credentials
In the Database Credentials window, enter the appropriate credentials for your Database.
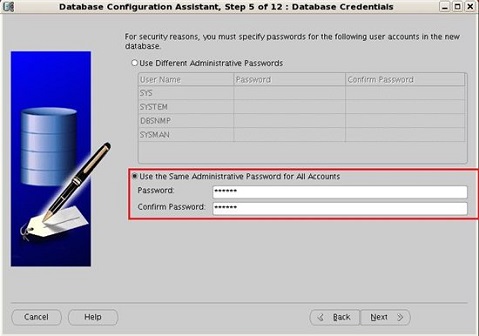
Figure 23 : ASM
In the Database File Location window, select:
- Automatic Storage Management (ASM) for Storage Type.
- Use Oracle-Managed Files for Storage Location.
- Browse to select the ASM disk group that you created to store the database files (DBDG)for Database Area.

Figure 24: Disk Group
In the Select Disk Group sub window, Select the Disk Group

Figure 25 : Recovery Configuration
In the Recovery Configuration window,
a) Specify Fast Recovery Area
b) Enable Archiving
Choose these options according to your environment and click Next

Figure 26 : Database Content Window
In the Database Content Window, Click Next

Figure 27 :Initialization Parameters window
In the Initialization Parameters window:
- Select Custom.
- For the Memory Management section, select Automatic Shared Memory Management.
- Specify appropriate values for the SGA Size and PGA Size.
- Click Next.
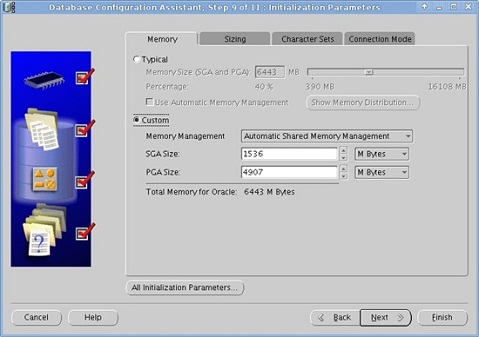
Figure 28 : Database Storage window
In the Database Storage window, click Next
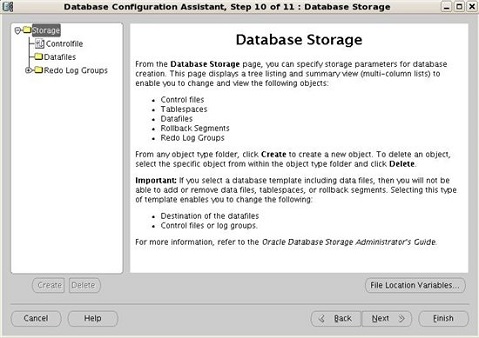
Figure 29 : Creation Options Window
In the Creation Options Window, click Next

Figure 30 : Summary window
In the Summary window, click Ok to create Database.

Figure 31 : Confirmation
Click Exit on the Database Configuration Assistant window after the database creation is complete.
Article Properties
Last Published Date
21 Feb 2021
Version
3
Article Type
Solution